Hello Crafty Folks!
Hope everyone’s summer is off to a great start. I wanted to share a little project I recently completed using Chalkboard Spray Paint. I had been meaning to do something with Chalkboard paint ever since a place I worked at used some to make a chalkboard in one of the conference rooms.
![]()
![]()
![]()


If you are not familiar with Chalkboard paint, it is pretty much what it sounds like.

Paint a couple of coats onto any number of surfaces and the surface that was painted becomes a usable chalkboard. Just write or draw on the surface with regular sidewalk/classroom chalk. The chalk markings can be erased and/or wiped clean with a damp cloth.
Many different types of materials can be painted with chalkboard paint. A look at the can of paint I have lists options such as: wood, metal, plastic and paper. I got the spray paint as opposed to the brush-on type of chalkboard paint because, at the time, that was what was available at my local craft store.
Thinking about it though, the spray paint probably provides more even coating with no brush lines. I believe you can also purchase larger amounts at hardware stores in the paint section, like if you wanted to paint to paint a classroom like chalkboard on a wall. I’ve seen two colors available, traditional black or dark green. I used the dark green for a bit of color.
Thinking about it though, the spray paint probably provides more even coating with no brush lines. I believe you can also purchase larger amounts at hardware stores in the paint section, like if you wanted to paint to paint a classroom like chalkboard on a wall. I’ve seen two colors available, traditional black or dark green. I used the dark green for a bit of color.
I decided to try my hand at spray painting a few small wood shapes like the ones here:

I purchased a door hanger and 4 plain wooden hearts. Once I got them out of the package, they were pretty much ready to go with no sanding.
To start, I laid the wood pieces inside the lid of a cardboard box I had, though newspaper can be used as well.
![]()
I followed the instructions on the can of spray paint, which included shaking the can for 2 minutes before the first use and holding the can 10 – 14 inches from the surface being sprayed. Make sure to spray paint in a well ventilated area. I went outside on a sunny day. I applied 3 coats of spray paint to each side of the wood cut-outs, making sure to let the paint dry at least 30 minutes between coats.
![]()
Be careful how thick the paint is going on with each coat. Too light of a coat and it’ll end up taking 10 coats of paints, too heavy and the paint may run or drip.

I followed the instructions on the can of spray paint, which included shaking the can for 2 minutes before the first use and holding the can 10 – 14 inches from the surface being sprayed. Make sure to spray paint in a well ventilated area. I went outside on a sunny day. I applied 3 coats of spray paint to each side of the wood cut-outs, making sure to let the paint dry at least 30 minutes between coats.

Be careful how thick the paint is going on with each coat. Too light of a coat and it’ll end up taking 10 coats of paints, too heavy and the paint may run or drip.
Once the final coat is applied, wait a full 24 hours before attempting to write or draw on the chalkboard with chalk. If you like, you can apply other paints to the chalkboard surface. I decorated the door hanger (badly) with Scribbles fabric paint (the kind in the little squeeze bottles), but regular acrylic paint can be used as well.
![]()
Just keep in mind any chalkboard area that is painted over will no longer function as a chalkboard.

Just keep in mind any chalkboard area that is painted over will no longer function as a chalkboard.
The door hanger piece would make a great “Do not Disturb” sign that could be modified once the occupant felt a little more like having visitors. It could also serve as an Open/Closed sign.
The plain wood cut-outs allow for a variety of uses. I drilled holes in two of the hearts using a small craft drill. In one heart, I drilled two holes (one in each “hump” of the heart).
![]()
In the other, I drilled one in the center.
![]()
When drilling, make sure to wear goggles and put a piece of scrap wood underneath whatever is being drilled. Since I did the drilling on a carpeted floor, I also placed a scrap piece of carpet under the scrap wood to catch sawdust. Once I had the holes drilled, it was easy to thread some ribbon through.

In the other, I drilled one in the center.

When drilling, make sure to wear goggles and put a piece of scrap wood underneath whatever is being drilled. Since I did the drilling on a carpeted floor, I also placed a scrap piece of carpet under the scrap wood to catch sawdust. Once I had the holes drilled, it was easy to thread some ribbon through.
The heart hangers can be used as door hangers, gift tags, or a dirty/clean indicator for the dishwasher. I’m sure there are a bunch of other things that could be done with them as well. Feel free to suggest ideas in a comment : )
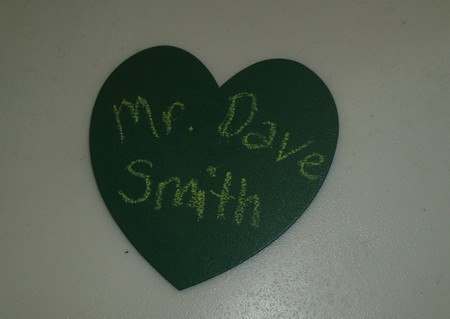
For the other two hearts, I left one as is. This one could be used as a table placeholder for a dinner party or wedding, or as a cute way to include a note in your child’s lunch.
![]()
![]() The last heart was easy to make into a magnet using some adhesive magnetic tape.
The last heart was easy to make into a magnet using some adhesive magnetic tape.


Just cut the magnetic tape into 2 or 3 small strips and place on the back of the wood shape and voila, it’s a magnet! Great for listing items you need to grab at the store.
Anyone else have any ideas for chalkboard paint? I’ve still got paint left in my can!
No comments:
Post a Comment